Sunday, July 31, 2011

Stamp of the Month

Today is a big day!  BIG DAY!!  I'm so excited for our launch party to celebrate the release of Close To My Heart's new idea book!  Almost as exciting is my very first Blog Hop!!  What is a Blog Hop?  I'm so glad you asked!

If you are coming here from Mary's blog then you already know what a Blog Hop is and you are at the right place.  If not then just follow the next blog at the bottom of this post and you will circle around or go to Kathleen's blog to start "hopping" there.  A Blog Hop is a place where you can view artwork and then go to another blog to view artwork with the same theme and then from there go to another and then another . . .  you get the idea.
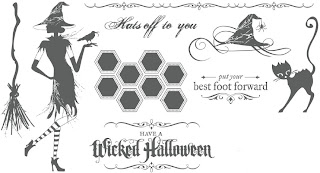
This Blog Hop is for Close To My Heart's Stamp of the Month (SOTM).   This is a GREAT way to view over SIXTY ways to use the stamp of the month!  This month's stamp set is called "Wicked"


With a $50 purchase this month you can get this set for $5 and to celebrate the changes to the SOTM program you will also get a typeset stamp for FREE!!!


So here is my card that I created using the SOTM


To make the honey look real I used the blending pen and colored over the stamped image just at the bottom of each hexagon with sunflower ink (honey would be even better but I did not have any honey ink).  Then I went over the colored part with Liquid Glass and made a few honey "drips" as well.  These are my two favorite items from CTMH (the blending pen and the liquid glass) - I use them a lot!!

Materials Used:
Stamp of the Month
Sunflower Ink, Cranberry Ink
Cranberry Cardstock
Colonial White Cardstock
B&T paper from kit no longer available (don't know the name, used it for the bees - you can use any kind of circle patterned paper for these)
Liquid Glass
Blending Pen

Now hop on over to Karen's blog  to see what beautiful artwork she created using this month's very cool stamp of the month - happy hopping!

Friday, July 29, 2011

Another cake card

I thought I would post some more paper flowers this week while I am away.  Here is a card I made using white paper flowers & the cake tutorial from last week.  


First I cut the three rectangles I needed for the cake and then scored them at
1/4" diagnal lines to make a diamond pattern on the "cake" 

Then I put glitter gel dots on each center with the lines met

I "iced" the cake with lace and added the flow of white paper flowers


Another shot of the finised product. 
I love how you can use this cake tutorial for multiple types of cards (wedding, birthday, celebrate, just because, etc.)  Have a great day!
Only 3 more days until our on-line celebration of the release of the New Idea Book!


Wednesday, July 27, 2011

Flowers and Liquid Glass

Last week I had a class on Liquid Glass.  I really love this product.  I showed everyone how to make patterned paper stand out by tracing parts of it with the glass.  Another tip is using the blending pen to ink sections of patterned paper and then go over them with liquid glass.  Here are a few pictures of the card we made.

Liquid Glass used to make "dew drops" on the rose, on the patterned paper and on the "thinking of you"

Again another picture of the rose but the focus is on the patterned paper behind it

Liquid Glass "brads" in the bottom corner of the card

Final Card - I really like this one.

For the patterned paper on this card I inked the diamonds first and then used the liquid glass.  The template I used for this card came from the Wishes Book.  Love these How-To Books - they are great when you feel like you are in a creative "funk"!


(only 5 more days until our on-line party!)  Join us here on August 1st for our celebration of the new Idea Book!  

Monday, July 25, 2011

Make it MONDAY #4


Good Monday morning to you all!  Hope you had a wonderful weekend.  As you read this my family is heading to Harvey Cedars Bible Conference with a group of youth from our church for our youth camp week!  Please pray for us!  So what can you do while we are traveling?  How about make project with your kids?

Also I was searching the web and found a bunch of "Make it Monday" blog sights but did not seem to see any with projects for you and your kids so I'm keeping our Make it Mondays.  I'm playing around with some other titles . . . Ohh how about Make it a Magnificent Monday?  I'll think on that one.  Now on to our project for today.  Paper Plate Frisbee.  I got this one from Make and Take blog.       


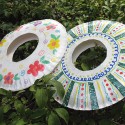
First you need 2 paper (or Styrofoam) plates for each Frisbee.  Then you cut out a large circle from each plate.  I have done this for two in the photo above and still need to do the two plates at the bottom of the photo.


Instead of having the boys color our plates (since we did not have paper plates) we cut out pictures we likes from a magazine.  I used the clear packing tape to cover the plates on top side and then they stuck their pictures to the tape on the bottom side of the plate (bottom and top are referring to the way you would set a plate on the table to eat off of it).  We also cut out letters to spell their names (sneak in some education here . . . wink, wink).  The photo above is the finished project.  **Note: Remember a previous post about me not being a fashion expert?  Well my oldest son's outfit proves that he got his sense of fashion from me and not his father.  He dresses himself every morning.  I hate these shorts but he loves loves loves them.  Oh and of course because it is summer and a gloriously stifling 98 degrees outside he is wearing long sleeves.  No worries people, in the middle of winter he will be in shorts and a tank top!**

Now it is time to head outside and try these babies out!  First in the yard - they work pretty well!


Now from the play house deck.  


She loves to watch her brothers play.  


My oldest demonstrates how it is done.  


Watching the frisbee.


Now she is no longer content to just watch.  She wants to try it out herself!


There is goes!  They worked surprisingly well and the kids loved them!  Have fun with this and then head over to www.makeandtakes.com and check out all the other fun projects they have under their Summer Camp section.  

May you find this Monday a marvelous one with your family.  As a close I'm counting some more of my reasons for living.  

972.  The playhouse, swingset, large yard and the imagination of my children.  
973.  Daily phone calls from my mother - love, relationships, and the ability to talk though miles away
974.  Lessons taught using the WORD of God - letter recognition in Scripture verses
975.  All my craft supplies, the inspiration to do them, the creativity and fun I have
976.  Scrapbooking with friends and family
977.  "Mom I am so glad you are my teacher" - My oldest - My leader boy
978.  The excitement from my children to learn, it is contagious 

Making Room for NEW


I'm super excited about the new catalog coming out August 1st.  Don't forget to join us for our on-line party right here (one week to go!) to celebrate.  In order to make room for the new the old has to go.  Here is a list of items that will no longer be available after July 31st.  So place your order this week to get your favorites!  I'm ordering some kraft borders, cardstock and inks/markers for sure!  


2011 Close To My Heart Retiring List
(items on this list are available until July 31st, only while supplies last)

Retiring Paper
As of August 1st, the majority of bulk cardstock packets (24 sheets) will be retired. Remaining bulk packets will be increasing in price, so stock up now!

Click here to stock up on your favorite colors of Cardstock! 
  
Retiring Ink Sets
As of August 1st, ink pad and marker sets will no longer be available. They will still be available individually but not in the sets!  Complete your ink pad and marker collection today.

Click here to complete your ink pad and marker collection today!


Retiring Blocks
Y1001 1" x 1 1/2" Block
Y1004 2 1/2" x 2 1/2" Block
Y1005 1" x 6 1/2" Block
Y1007 2" x 11" Block
Y1011 4 1/2" x 6 1/2" Block
Y1500 Block Starter Kit
 Click here to buy these blocks before they are gone! 

Retiring Stamp Sets
B1313 Merry Pursuits
B1319 Four Seasons
B1325 Welcome Baby
B1333 Merry Monsters
C1292 Tropical Christmas
C1318 Best Wishes
C1324 Spooky Smiles
C1328 Festive Frills
C1333 Spooky Night
C1340 Aspiration
C1342 Damask Tiles
C1350 Dainty Thoughts
C1353 Gear Up
C1354 Robot Power
C1361 Buttoned Together
C1362 Youre a Hoot
C1366 Fringed Phrases
C1371 Holiday Jingle
C1372 Grateful Hearts
C1373 In the Game-Hockey
C1374 Spellbound
C1375 In the Game-Football
C1376 Stocking Style
C1377 Christmas Story
C1378 Heartfelt Christmas
C1380 Judiac Commentary
C1381 Card Chatter -Thank you
C1384 Neighborhood
C1386 Boys at Play
C1387 Playin Hard
C1391 Embrace Life
C1394 Candlelight
C1398 Love You Forever
C1402 In the Month of January
C1406 Hit the Spot
C1421 The Boo Crew
C1426 Thanksgiving
C1428 Ice Crystals
C1430 In the Month of September
C1431 In the Month of October
C1432 In the Month of November
C1433 In the Month of December
C1434 School Rules
D1166 Vintage Christmas
D1171 New Fallen Snow
D1177 No Peeking
D1224 Holiday Joy
D1225 Jingle Borders
D1226 Magical Season
D1243 Peace on Earth
D1244 Snow Friends
D1257 Make It Count
D1258 Friendship Word Puzzle
D1265 Gracious Greetings
D1266 Baby Steps
D1280 Spot On Backgrounds
D1299 Thoughtful Seasons
D1305 Gloria
D1315 Evergreen
D1317 Feathery Flakes
D1319 Creepy Cobwebs
D1324 Christmas Melodies
D1326 Season of Splendor
D1332 Boutique Borders
D1333 Wishing Star
D1335 Intrinsic Backgrounds
D1339 Moments in Time
D1347 Confidential
D1349 Be Yourself May
D1350 Tender Tags
D1352 It’s Your Day
D1354 Endless Friendship
D1355 Gracious Greeting-F.
D1356 Gracious Greetings-S.
D1359 Comments
D1363 Picture Perfect
D1365 True Happiness
D1366 Holiday Trinkets
D1369 Delightful Things
D1370 Welcome Home
D1371 Many Thanks
D1372 Grown with Love
D1374 Ms. Holiday Cheer
D1375 Treasures
D1376 Holiday Warmth
D1379 Flourished Blessings
D1380 Just for the Holidays
D1381 Beware
D1382 Holiday Hoopla
D1383 Santas List
D1385 Good Work
D1393 Flourished Blessings-F.
D1395 Flourished Blessings-S.
D1406 True Friends
D1416 State of Mind
D1421 Cherish the Moment
D1422 Wonderful Friend
D1423 Happy Forever
D1424 Something Splendid
D1428 Happy Journey
D1433 My Game
D1439 Spook Alley
D1450 Beautiful Day

Click here to snatch your must have stamp set before it's gone! 
Retiring My Reflections Kits
X7132A Bliss Level 1
X7132B Bliss Level 2
X7132C Bliss Stickease
X7133A Miracle Level 1
X7133B Miracle Level 2
X7133C Miracle Stickease
X7134A Sweetheart Level 1
X7134B Sweetheart Level 2
X7134C Sweetheart Stickease
X7135A Wings Level 1
X7135B Wings Level 2
X7135C Wings Stickease
X7127A Magnifique Level 1
X7127B Magnifique Level 2
X7127C Magnifique Stickease
X7128A Olivia Level 1
X7128B Olivia Level 2
X7128C Olivia Stickease
X7129A Hooligans Level 1
X7129B Hooligans Level 2
X7129C Hooligans Stickease
X7130A Mistletoe Level 1
X7130B Mistletoe Level 2
X7130C Mistletoe Stickease
Click here to order these My Reflections Kits before they retire! 


Workshops on the Go
The following Workshops on the Go's will retired at the end of August. Order them now or plan ahead to make sure you don't miss out.

G1023 Miracle Workshohp Kit
G1022 Mayberry Workshop Kit
G1021 Fanfare Workshop Kit
G1020 Bliss Workshop Kit
G1019 Sophia Workshop Kit
G1018 Lucky Workshop Kit
G1017 Sweetheart Workshop Kit
G1016 Wings Workshop Kit

Click here to add a Workshop on the Go or two to your order! 


Retiring Accessories
Z1154    Designer Ribbon Buttercup
Z1209    Designer Ribbon Cranberry
Z1125    Designer Ribbon SweetLeaf
Z1223    DEs Booksmart
Z1156    DEs Borders
Z1140    DEs Framed Fun
Z1312    DEs Stars            
Z648      Emb Powder Baby Pink
Z671      Emb Powder Clear
Z647      Emb Powder Heavenly Blue
Z664      Emb Powder Pansy Purple
Z678      Emb Powder Silver Pearl
Z1400    Fanfare Ll 2 Assort (brads)
Z263      Fun Flock White
Z1354    Irresistibles Miracle

Z1390    Irresistibles™ Villa
Z1300    Just Blooms White Daisy
Z1377    Kraft Color-Ready Borders
Z1166    Mini Album Cream
Z1340    Mini Medley Lagoon
Z1277    Mini Medley Outdoor Denim
Z1339    Mini Medley Pear
Z1243    Mini Medley Pewter
Z1141    My Creations Mini-Binder
Z1009    Pivot Point Stapler
Z1231    Rub-ons Across The Board
Z1265    Rub-ons Primavera
Z1211    Top Coats Framed In
ALL         DEs Monogram

Z1021 Envelope Flats 2 1/2" x 3 1/2"
Z1022 Envelope Flats 3" x 3"
Z1023 Envelope Flats 3" x 4 3/4"
Z1024 Envelope Flats 4" x 4"
Z1244 Envelope Flats 4 1/2" x 4 1/2"
Z1025 Envelope Flats 5" x 5"
Z1026 Envelope Flats 5" x 7"
Z1027 Envelope Flats 5 1/2" x 4 3/4"
Z1028 Envelope Flats 6" x 6"
Z1029 Envelope Flats 8" x 3 1/2"

Z338 Euro Paper Trimmer
Z339 Euro Replacement Blades
Z340 Euro Replacement Blade/Scoring
3501 Red Eye Pen
Z1289 Block Buddy Set
Z1090 Texture Tools
Z263 Fun Flock
Z185 My Accents Block Organizer


Click here to order your must have accessories! 


Happy Shopping!
Thanks to fellow consultant Christine for this list!  

Sunday, July 24, 2011

Life is Good

Here is my layout for Sketchy Thursday's Challenge this week

The sketch


My page

Some details

And more details (see my little Caterpillar moving across the page?
I stitched his trail)

And finally as a two page layout

Saturday, July 23, 2011

Ribbons and Lace


Yesterday I posted that I found some awesome paper flower tutorials on Connie's blog.  Here is another card I made using those flower.  I also used lace so I decided to enter this one in for Heart 2 Heart instead of the other cake card that I made.  Let me tell you that the Heart to Heart challenge this week was truly a CHALLENGE for me!!  I am not a girly girl and by no means do I like make-up, dresses, pink and certainly not lace (funny that I love love love flowers?).   After trying to come up with something I liked for this challenge I found that I do kind of like lace - LOL.     


To make the flower take a white square of paper, fold in half to make a triangle.  Then fold in half to make a smaller triangle but don't make a hard fold.  Instead pinch at the bottom corner to find the center.  Take one side and fold from the center up and then do the same with the other side to make a shape like the photo above. 


Cut out a petal shape like shown


Unfolded flower looks like this


Inked with purple ink using a sponge.

The center of the flowers and larger purple flowers are made the same way you make the
centers for the black eyed susan flowers


A frew details photos


The final card!

Related Posts Plugin for WordPress, Blogger...