Monday, April 30, 2012
May Stamp of the Month Blog Hop

Friday, April 27, 2012
Pinworthy Projects Linky
Welcome to the beginning of the Just Us Four blogiversary week!
Technically, Just Us Four started on April 29th but the celebration is starting a little early and ending a little late.
Be sure to visit Just Us Four starting on Monday for a ton of great giveaways all week! I'm super excited to be co-hosting with Shannah over at Just Us Four this week to help her celebrate :) Now, on to the party...

Did you create something Pinworthy these week?
Link it up below!
A few {minor} rules:

1. Don't link your project in the giveaway linky or vice versa.
2. Be sure to put a permalink back to my blog in any post you link up...giveaway OR project. You can grab a button OR just include a link back here. {Of course, I would LOVE it if you would follow me via GFC, Linky Followers and/or email!} 3. Please go visit at least 2 other projects you see in the linky. We all like for visitors to stop by so share the love.


Stamp Set Giveaway
***this set is no longer available for purchase***
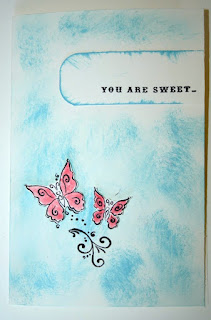
Here are a few cards I made with this stamp set over the weekend using the Dotty For You paper pack (available for only $5 this month with a $35 purchase).
I used a photo album on the Close To My Heart Facebook page as inspiration. Here are some of their sample cards made with this stamp set.
Would you like this stamp set to make your own cards?
Enter to win:
over at My Best Friend's Blog

Saturday, April 21, 2012
Guest Post & Giveaway
And the winner is . . . comment #11 - which was
One thing I love about blogging is the chance to meet some great talents. Amy from Then She Made is one of those crafty ladies :) She is here today with a tutorial on how to use your stamps in an unconventional way and to give away one of her fabulous necklaces! So without further ado . . . Here's Amy!
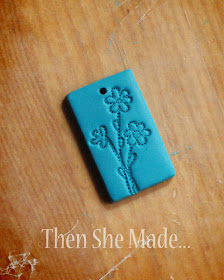
Hello There! I'm excited to be visiting here and offering a little giveaway today. I'm Amy from Then She Made... Then She Made... is my own little corner in blogland where I like to share, well, the things I've made. One of those things is this pendant necklace made from oven bake clay and stamps that I bought from Elizabeth.

Delco Deal DivaApr 21, 2012 08:45 PM
So sweet! love it! Thanks for the chance!
delcodealdiva@yahoo.com
delcodealdiva@yahoo.com
Congrats Kelly aka Delco Deal Diva :) please e-mail me your mailing address at alwaysdeeper at hotmail dot com so I can send you your prize package :) Thanks so much for playing along and if you do make a necklace using this tutorial I'd love to know about it! Drop me an e-mail or leave a comment with the link.
One thing I love about blogging is the chance to meet some great talents. Amy from Then She Made is one of those crafty ladies :) She is here today with a tutorial on how to use your stamps in an unconventional way and to give away one of her fabulous necklaces! So without further ado . . . Here's Amy!
Hello There! I'm excited to be visiting here and offering a little giveaway today. I'm Amy from Then She Made... Then She Made... is my own little corner in blogland where I like to share, well, the things I've made. One of those things is this pendant necklace made from oven bake clay and stamps that I bought from Elizabeth.
I'm thinking this would be great for Mother's day. It's just a few weeks away after all and you're probably trying to think of what to get your awesome mom, right? Well, here's an idea, make her a personalized necklace using some of your CTMH stamps. Here's the step by step tutorial...
Step 1: Start by picking out a stamp you will use. I used the cute little flowers from the "A Garden" set above.
Step 2: Next, pick a clay color. I went with Sculpey Turquoise. There are lots of different oven baked clays out there. Just check your local craft store or Hobby Lobby on-line. Sculpey is my favorite though. Once you've picked your color, break off a small piece and do what is called "conditioning". Basically you are just going to knead the clay and play with it for a few minutes to get it soft and workable. Then, press your clay flat like shown above. Kept it's thickness consistent, around 1/4 of an inch.
Step 3: Then, take your stamp and press it into the clay. You could use an acrylic block for this but I didn't have one handy so I just used the stamp. You want your stamp impression to be fairly deep and show well. If it doesn't happen that way the first time, just roll your clay up and start again.
Step 4: Using a cutting tool, cut the clay into the shape you want and remove the extra clay.
Step 5: Next, and this is optional, I like to add a little more detail to my stamped impression. So, using a sharp, pointy tool like a needle or toothpick, I basically trace the design by poking small holes in it. Later on in the tutorial we use paint and poking these holes will help your paint settle into your design a little better. Just don't poke them too deep or they will show on the back.
Here's a closer up look of the little holes in the design.
Step 6: Poke a hole in the center top of your pendant. Don't forget this step, it's an important one. You want the hole big enough so that a jump ring or jewelry bale can fit in it.
Step 7: Now that the front of your pendant is designed, if you want you can turn it over and add a personal message. I choose "love blooms" and added it by first spelling it out in small dots - kind of like in Step 5, then carefully connect the dots and make lines.
Step 8: (not shown) Once you are done, place your completed design on a paper lined cookie sheet. I just use regular, plain printer paper. Then bake in a pre-heated 275 degree oven for 15 minutes. Once it's done baking, remove it from the oven and let it cool completely before moving on to the next step.
Step 9: Now we paint. Choose a color that you'd like to go in the design on your pendant. I usually go with a dark brown. You will also want to keep a little water and some paper towels close by.
Step 10: Paint your pendant like shown above. Be sure to get paint into the design area. Then, while the paint is still wet, using a dry paper towel, carefully wipe the paint off of the top surface. Don't push the towel into the design, you want the paint to stay there. Then, after the majority of the paint is off, dip a paper towel in to water, remove the excess water so it is just barely damp, and clean the pendant up. You want to remove any paint on the top surface that didn't come off when you did the dry wipe. Be sure to check the sides too.
Technically you could end there but I like to give my pendants a finishing touch.
Step 11: I use a polyurethane finisher, it needs to be water base and I just paint a thin coat on the pendant and let it dry. Two coats is usually enough.
Step 12: After it's dried for several hours, now you can turn it into a necklace. You will need a chain and clasp, a jump ring or bale (I like bales) and enough supplies to make a small dangling charm.
Step13: Put the bale on first. If you are new to jewelry making, the bale is the little silver piece that hooks the pendant to the chain (it's pinched in between my fingers in the above photo). Then, hang your charm from the bale.
Step 14: Now all you need to do is attach it all to a chain!
Now the big question comes, who'd like to win this cute necklace pendant? If it's you, leave a quick comment and make sure you leave your name and a way that we can contact you other wise another winner will be picked. We'll draw a winner on April 29th!
So, that's it - thanks Elizabeth for letting me stop by for a visit. If you'd like to see more of my creations you can visit me at www.thenshemade.com, facebook or find me on Etsy.
Thanks so much Amy! Glad to have you here!! I have some exciting news for you! Along with this necklace I am also giving away the A Garden Stamp Set so you can make your very own necklaces if you want :)
To Enter to win this fabulous necklace (wish I could enter - I so want one! Guess I'll go over and buy one!!):
1. Mandatory - Leave a comment with your name and a way that we can contact you if you are the winner
Other Optional Entries (Make sure to come back and comment for each entry):
2. Visit ThenSheMade and say "hi"
3. Visit Amy's Etsy shop. Come back and tell me which is your favorite necklace.
4. Facebook and/or Tweet about this giveaway (two possible entries here)
5. Visit Then She Made facebook page and tell her who you would give this necklace to if you win
6. Visit Broken Treasures facebook page and tell me what you would do with this stamp set if you win :)
Remember to participate before April 29th when we will pick our winner. Winner will be announced here on this post so check back and see if you won.


